

Installing and Configuring the Stella Connect Salesforce Managed Package
This new version of the Stella Connect managed package allows for the use of multiple base objects, rather than just one. You’ll notice that once you install the update, the configuration page will provide the option to add additional mapping tabs — this is the main difference between the old version and the new one.
We’ve also made improvements to error handling to ensure that the managed package is less likely to automatically turn off the integration when errors begin occurring for issues like the customer email address missing from a request, or the channel not being identified for an interaction. Now, these errors will occur inside of Salesforce and will be visible if you view the Stella Connect Requests list. We will send you one notification email on the first error, and a subsequent notification email on the 10th error within 24 hours.
Note: Before updating to the new version, if you already have field mappings for base objects from an older version of our managed package, we suggest taking a screenshot of those field mappings in case they’ll need to be re-done.
You can follow the instructions below to install and configure the new managed package.
Step 1: Install the Managed Package
Visit the link below to begin the installation of the Stella Connect managed package:
-
Production: https://login.salesforce.com/packaging/installPackage.apexp?p0=04t2M0000037Ro3&isdtp=p1 (version 1.48.37)
-
Sandbox: https://test.salesforce.com/packaging/installPackage.apexp?p0=04t2M0000037Ro3&isdtp=p1 (version 1.48.37)
Once you see the installation panel:
- Select All users, check the acknowledgment box and click next.
- Grant access to 3rd party websites and continue. The installation will begin. Click Done when the installation completes.
Now you can begin configuring!
Update integration status
Retrieve your API Keys and Secret Key from the Integrations page within Stella Connect. If you do not have access to Stella Connect and need your API keys, please reach out to your organization's Stella Connect Company Admin. If your secret key has already been downloaded by someone in your organization, they will need to provide that key to you, as well.
Navigate to the Integration Status tab. This can be found in the Salesforce App Launcher as “Stella Connect Configuration”. On this page, insert your test and production API keys and your secret key. Save the API keys.

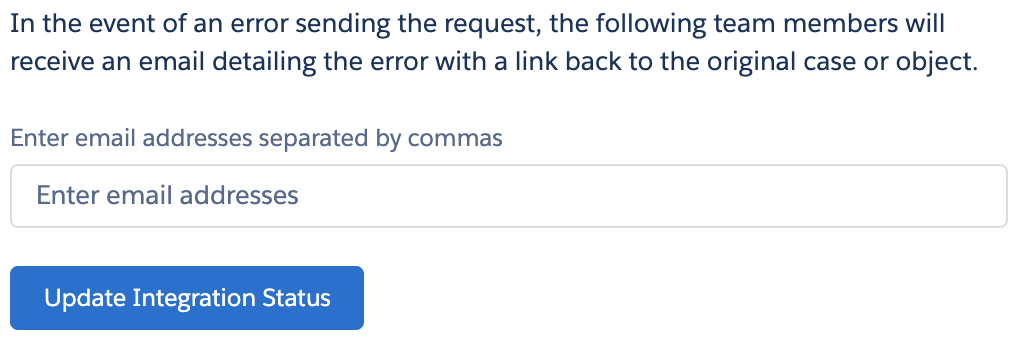
Next, enter your error alert email address, Update Integration Status, and move on to Step 2.
Step 2: Create Trigger and Data Mapping
Create Lookup Field(s) on the Request Object
Next, you'll create a new custom lookup field on the Stella Connect Request object. This field is used to look up to the base object that you'll track your interactions on. You'll need to create a custom lookup for each object being used to trigger Connect Requests.
Note: This step can be skipped for Tasks and Events base objects since a custom lookup is not available for these types of Salesforce objects.
- In Setup, enter Object in the Quick Find box, then find and select Stella Connect Request
- Select New, and then Lookup Relationship
- Select your base object from the dropdown menu
- The field label will be populated by default
- Enter a field name. You could use Case_Lookup if your base object is case, for example.
- Description: This is the object that triggers a Stella Connect Request
- Select Next
- Set your field-level security, click next and save.
Create DateTime Field on Base Object(s) to Store Trigger
On your base object(s), create a new custom DateTime field that will be used to identify when an interaction is eligible for a Stella Connect feedback request.
- Field label: Send Stella Connect Request at and tab through field name
- Description: This is the time at which an object becomes eligible to receive a Stella Connect Request
- Click Next
- Set your field-level security, click Next through, and save
Create Trigger(s)
Create a new workflow or process builder which will populate the previously created DateTime field, based on actions that your team members complete, for each base object. This workflow should contain the business logic to include and exclude interactions from being surveyed.
Note: the timestamp is used to determine which objects should be included since the last job ran and does not denote the actual time that request was sent. Reminder: the job runs every 5 minutes in the background.
Example: If you'd like to make all Cases eligible for Connect requests as soon as they're closed, your workflow would populate the custom DateTime field with the time that the Case was closed.
- Enter Workflow in the Quick Find box and select Workflow Rules
- Select New Rule and select your base object
- Rule Name: Send Stella Connect Request
- Description: Sets the Send Stella Connect Request datetime field
- Rule Criteria:
- Case Closed equals true
- Case Contact Email not equal to "leave this blank"
- If you're implementing Service Recovery, Case Type is not equal to Service Recovery
- Add Any additional business logic, like Case Owner is not “Queue Name” if agents sometimes assign cases to queues after they close them.
- Select Save and Next
- Add new workflow action > New field update
- Name: Set Stella Connect Request Datetime and tab through Unique Name
- Description: Sets the datetime field
- Field to update: Select your newly created custom DateTime field from the list
- Select Use a formula to set the new value and enter formula: NOW()
- Save and Done
- Then Activate the workflow rule
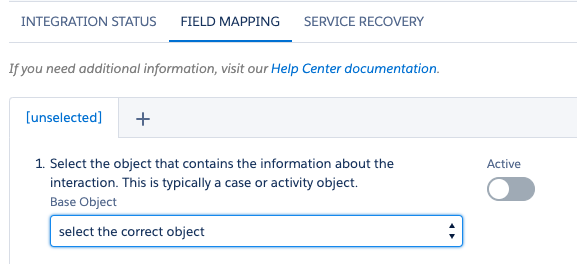
Create Field Mapping(s) to Send Data to Stella Connect
On the Stella Connect Configuration page, you'll create a Field Mapping for each Base Object that will trigger a Connect request. Create a field mapping tab by clicking the + sign. Each field mapping will tell the application where to find the appropriate piece of information required to send a feedback request.
Be sure to save each field mapping tab and mark them as active when you’re done. If you need to, you can delete a field mapping from the lower right-hand corner by clicking Remove Field Mapping.
Step 3: Test and Then Deploy to Production
Testing
All surveys will be delivered to the address entered into the API Test Email field on your Integrations page within Stella Connect while you're using the test key. This allows you to see what your customers will see when they receive a survey. You can step through the customer experience selecting a star rating, commenting, etc. There is no response collection while using your test key.
Note: Please ensure that you are closing cases owned in Salesforce by a person who has an active Stella Connect profile and that you have each channel you will use in Stella Connect enabled so that you can pass through the correct case origin. For assistance with this step, please reach out to your account's CSM.
All test data is collected on the Test Requests tab in Stella Connect, on the API Request Status page (https://yourdomain.stellaconnect.net/admin/company/api/request_status).
Testing is an opportunity to confirm that the field mappings and workflow you've set up are behaving as expected. If agents have been sending manually, they can continue to do so while you're testing.
The test period should be long enough to experience all types of use cases and variations of the triggers you built, to ensure that they're working as you intended.
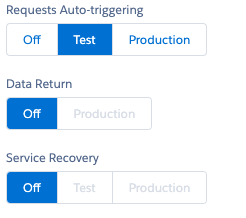
To enable testing, go to the Stella Connect Configuration page in Salesforce and make sure the Requests Auto-triggering switch is turned on to Test.
Going live
Everything looks good? Test requests are being created for each interaction that you would want a Stella Connect request to be sent out for? Great!
Two last steps:
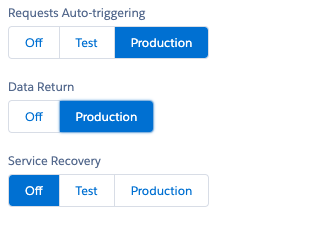
Go to the Stella Connect Configuration page within Salesforce and change the integration status to Production for Requests Auto-triggering and Data Return and update the integration status.
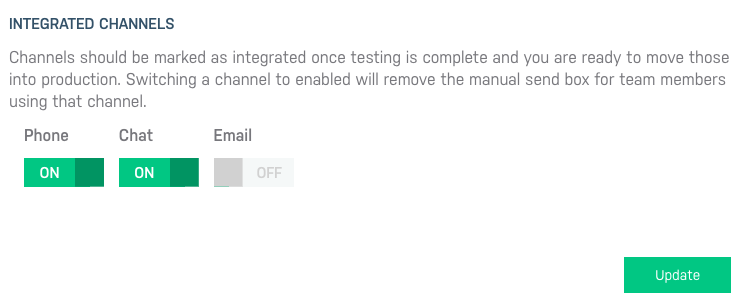
In Connect, on your Integrations page (https://yourdomain.stellaconnect.net/admin/company/api), switch the appropriate Integrated Channels to ON. This example shows phone and chat will be integrated. Turning a channel on here will remove the manual send box from the Stream.
You're done! Now that you're on Production, you can monitor Salesforce to ensure that requests are being created when cases are closed (or any other triggering event you've set up!) and look at the Invalid Requests tab on your API Request Status page in Stella Connect (https://yourdomain.stellaconnect.net/admin/company/api/request_status) to ensure that requests have all of the required information needed to be successfully sent to your customers. If requests are appearing on the Invalid Requests tab, you'll see an error under each request that tells you why that request failed so that you can make necessary corrections in Salesforce.
Comments
0 comments
Please sign in to leave a comment.