For a refresher on how the service recovery process works, please review Service Recovery with Stella Connect
Before You Begin
Service Recovery follow-up tickets will be created in your Zendesk instance when a survey response that meets your criteria is received. For example, if your criteria is 1-3 stars with a comment, we will create a follow-up ticket whenever a Team Member receives a 1, 2, or 3-star survey response with a comment. Using Service Recovery webhooks, we have the ability to adjust the criteria your team uses to trigger a follow-up ticket in Zendesk -- if you're interested in using Service Recovery with Zendesk, please reach out to your CSM!
When the Service Recovery follow-up ticket is created in Zendesk, we will always add the tag stellaconnect_service_recovery. This tag can be used to create a View in Zendesk if you'd like to organize your Service Recovery workflow.
Below, we'll go over the Zendesk configuration for Service Recovery!
Step 1: Create a Target for Service Recovery
Service Recovery requires sending requests to a separate Stella Connect API endpoint. When your team solves a follow-up ticket, your Service Recovery trigger (which we'll set up below) will go off and send a survey request to the Service Recovery endpoint, which will send out a Service Recovery survey to your customer.
- In Zendesk, navigate to the Admin menu by clicking the gear icon in the left-hand side menu
- Scroll to the bottom, and under Settings, select Extensions
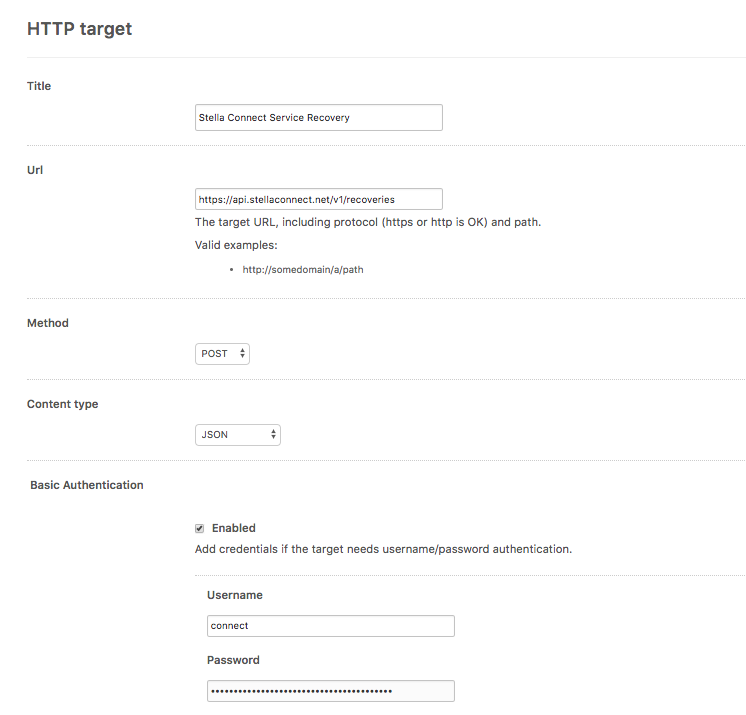
- Click add target on the right-hand side, and on the next page, select HTTP Target. Below are instructions for filling out the fields you're presented with.
- Title: "Stella Connect Service Recovery"
- URL: https://api.stellaconnect.net/v1/recoveries
- Method: Post
- Content Type: JSON
- Basic Authentication: Enabled
- Username: connect
- Password: Test API Key from your Stella Connect Integrations page

To test your new target, select Test Target from the dropdown menu and then click Submit. Below, we've provided some simple test JSON for you -- you can simply copy and paste the code below into the pop-up box and click Submit.
{
"do_not_send": true,
"tags": [
"compensation provided"
],
"employee": {
"email": "pete.sellar@blancapeak.com"
},
"initial_feedback_request_id": "54bd2af9-28cb-48df-8c60-cd27de080cd4",
"ext_interaction_id": "64664523",
"external_url": "https://blancapeak.your-source-system.com/cases/64664523"
}
If your test is successful, you should see an HTTP/1.1 200 OK response. Now you can close the window, select Create Target from the dropdown menu, and click Submit to complete the new target setup.
Step 2: Create Your Service Recovery Trigger
Now, we'll need to create the trigger that goes off when your Service Recovery follow-up tickets are solved.
- To create a new trigger, access the Zendesk admin menu by clicking the gear icon in the left-hand side menu
- Scroll down until you find Triggers in the menu, and select it
- Click Add Trigger in the upper right-hand corner. Below, we've provided basic trigger configuration instructions for you, but please keep in mind that you may need to add additional, unique business rules to your trigger.
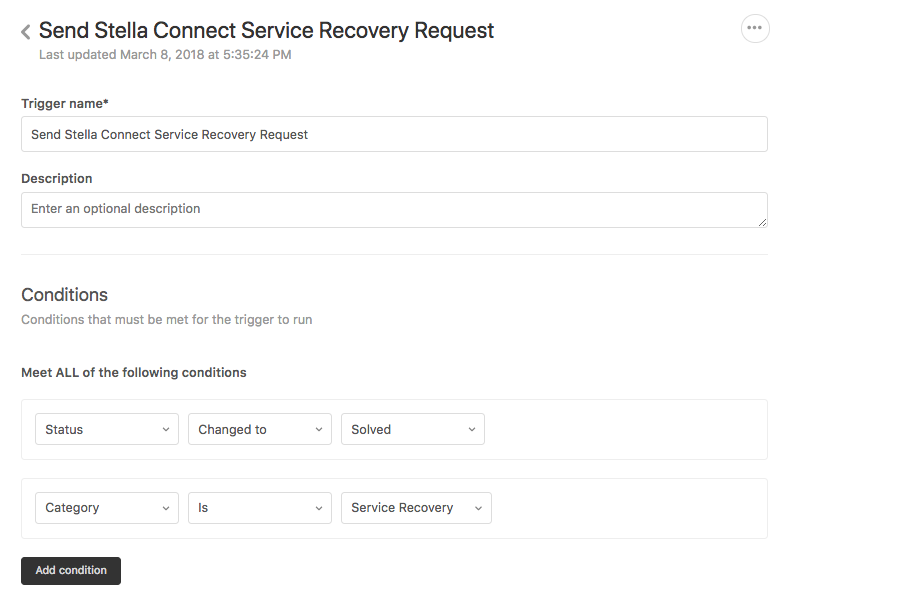
Trigger Name: Stella Connect Service Recovery
Under the Meets ALL of the Following Conditions section:
- Status - Changed To - Solved
- Tags - Contains at least one of the following - stellaconnect_service_recovery
- Any additional business logic
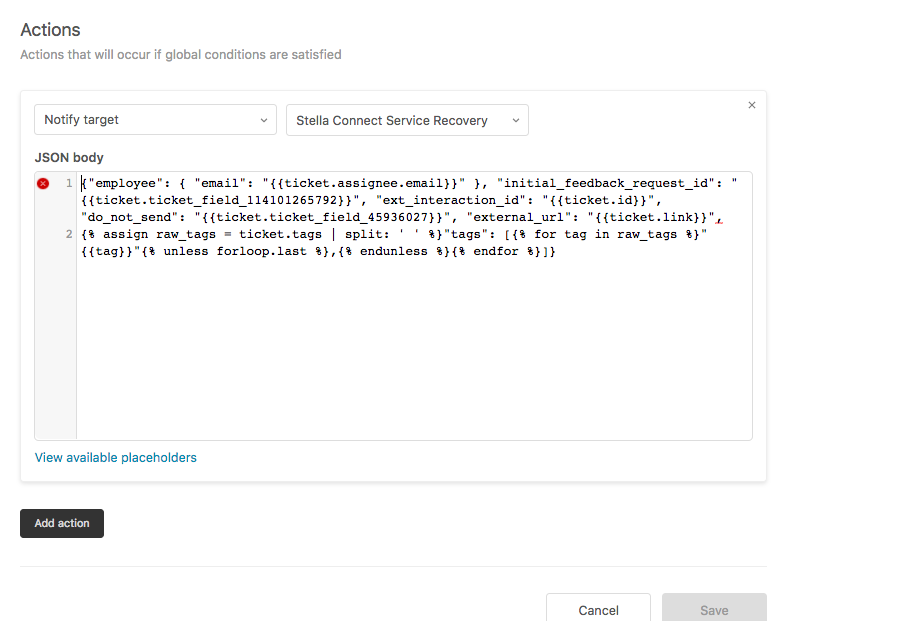
Next, add an Action to your trigger at the bottom of the page. Select Notify Target and then choose your Stella Connect Service Recovery target we created earlier.
Below, we've provided the default JSON body for you to paste into the text box that appears. Please delete the brackets that appear in the text box once you click into it, then paste the code below into the box.
{"employee": { "email": "{{ticket.assignee.email}}" }, "initial_feedback_request_id": "{{ticket.external_id}}", "ext_interaction_id": "{{ticket.id}}", "do_not_send": "{{ticket.ticket_field_YOUR CUSTOM ID}}", "external_url": "{{ticket.link}}", {% assign raw_tags = ticket.tags | split: ' ' %}"tags": [{% for tag in raw_tags %}"{{tag}}"{% unless forloop.last %},{% endunless %}{% endfor %}]}
In the code provided, please make sure to replace YOURCUSTOMIDHERE with the field ID number for your Do Not Send Survey checkbox. This should have been set up when the initial survey integration was configured in Zendesk.
To find the ticket field ID number, go to the Zendesk Admin menu, click on ticket fields, find your do not send checkbox field on the list, and copy the ID number displayed.
Example of a completed Service Recovery trigger:


Step 3: Update Existing Triggers
Next, we'll need to update all of the triggers for your initial surveys. There may be more than one trigger if you're sending surveys for multiple channels. Updating the trigger to exclude Service Recovery tickets will ensure that when Service Recovery follow-up tickets are solved, the initial survey trigger doesn't go off and send the wrong survey to your customer.
For every Stella Connect Survey trigger (excluding the Service Recovery trigger we just set up!), add the following to the Meets ALL of the Following Conditions section:
- Tags - Contains none of the following - stellaconnect_service_recovery
Testing Workflow
Once the above step is complete, you can go ahead and create a test ticket in Zendesk. Pretend you're the customer in this situation by sending in a support ticket from your own email address, then open the ticket in Zendesk, leave a comment and solve the ticket. Your original survey trigger should have gone off, sending you a Stella Connect CSAT survey. Respond to the survey, remembering that your response will need to fit your Service Recovery criteria.
Once you've responded, you should see a follow-up Service Recovery ticket created in Zendesk that references your test ticket as the original ticket number. Leave a comment on that ticket and solve it - you should receive a second, follow-up survey! That's the Service Recovery workflow. If you reply that follow-up survey, you can go to the Stream to see what the response will look like (it will appear as being connected to the original survey's response, for convenience!) and you can remove the feedback from the Stream at this time if you'd like.
Once testing is complete, you can move on to the last step -- going live in production!
Step 4: Moving to Production
The last step is going live, so we'll go ahead and open our Service Recovery target back up and change the password (which holds your test API key) to point to your Stella Connect account's production API key.
- To find your Service Recovery target, open the Zendesk Admin menu by clicking the gear icon on the left-hand side
- Scroll to the bottom and click on Extensions
- Find the Stella Connect Service Recovery target, and click edit which will appear on the right-hand side once you hover your cursor over the Service Recovery target's name
- Once on the Service Recovery target page, simply paste your Stella Connect Production API key into the Password field on this page
- Select Update Target from the dropdown menu at the bottom of the page, and click Submit
Now you're live! When agents receive negative feedback that meets your Service Recovery criteria, and the follow-up ticket we create in Zendesk is solved, we'll send a follow-up Service Recovery survey to capture the customer's sentiment after you've had the chance to make things right!

Comments
0 comments
Please sign in to leave a comment.